- Details
- Category: Markers
Placing Markers
This part is straightforward.
Open the TacO menu and click “Open Marker Editor.” A small window will appear with several smaller buttons.
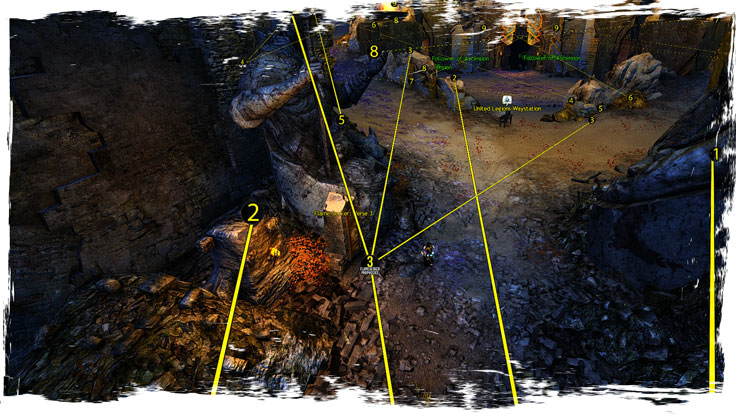
At the bottom, you’ll see numbers 1–5. These represent the markers currently assigned to keybinds. Click a number and select a marker from the menu structure (it’s the same as in my pack).
• Marker 1 can be rebound in GW2 TacO Settings → Rebind Keys → Add New Marker.
• Markers 2–5 are rebound in Marker Editor → Rebind Keys.
After placing a marker, you can click it and reposition it.
Important: Every marker you create is stored in the file “poidata.xml” in the main TacO folder. You can only edit markers inside this file. If you try to move a marker that already exists in a pack, the change will not be saved. Editable markers are shown in green text.
Drawing Trails
Creating a trail is a bit more complex.
-
In Marker Editor, click the Record icon to start recording. As you move, the trail is placed beneath your character’s feet.
-
When finished, click the Save button and save the file. It must have the .trl file extension. Make sure the name is lowercase, no spaces, no dashes, no other symbols than underscores, or it can cause issues.
-
Save often. It’s easy to lose progress due to a misclick, crash, or other issue. After saving, you must load the trail file back again to continue. Do not keep drawing immediately after saving, or it will bug out.
-
Every time you save, a duplicate trail entry is added to the bottom of poidata.xml. You only need one, so delete the extra copies.
-
Saved trail will be invisible until you edit the XML entry. At minimum, add “fadeNear” and “fadeFar.” For a fully working trail, also add “type,” “animSpeed,” and “texture.”
Example of a freshly saved trail entry (how it looks originally):
<Trail GUID="qoWB/R1Km0KlQo0ZyOhx5Q==" trailData=".\Data\TW\VoE\StarlitWeald\tw_voe_starlitweald_adv_seermagic_toggletrail.trl"/>
How it should look after editing:
<Trail type="tw_guides.tw_voe.tw_voe_starlitweald.tw_voe_starlitweald_adv_seermagic.tw_voe_starlitweald_adv_seermagic_toggletrail" GUID="qoWB/R1Km0KlQo0ZyOhx5Q==" fadeNear="5500" fadeFar="5600" trailData="Data/TW/VoE/StarlitWeald/tw_voe_starlitweald_adv_seermagic_toggletrail.trl" animSpeed="0" texture="Data/TW/General/tw_trail_link.png"/>
Also, make sure to replace backslashes (\) with forward slashes (/) in the file path. If you don’t, the trail won’t load properly in a pack.
Best practices while making trails.
- Trails are a sequence of connected points, and if you just walk, points are placed close to each other, which will result in a mess in rough terrain or in the air. Instead, bind and use the key for "pause/resume trail" and use it constantly, because when you pause the trail, the next point is placed once you resume, no matter the distance, and those two points are connected.
- My way of drawing is to pause, do 2-3 steps, stop, unpause, and pause to place a point and do another 2-3 steps. Doing this makes a nice, clean path and also results in smaller trail files.
- If you need to cut the trail and continue elsewhere, like after the portal, pause and click on "create new trail section."
- If you make sharper turns, place several points into it; otherwise, it will twist and squeeze the texture.
- You can edit the trail after you save it. But make sure you reload it first, do not record any track, and have xml entry already edited. Then you can click on any point along the trail and reposition or delete it.
- Details
- Category: Markers

INSTALLATION - TACO INSTALLATION - BLISHHUD ALL-IN-ONE DOWNLOAD
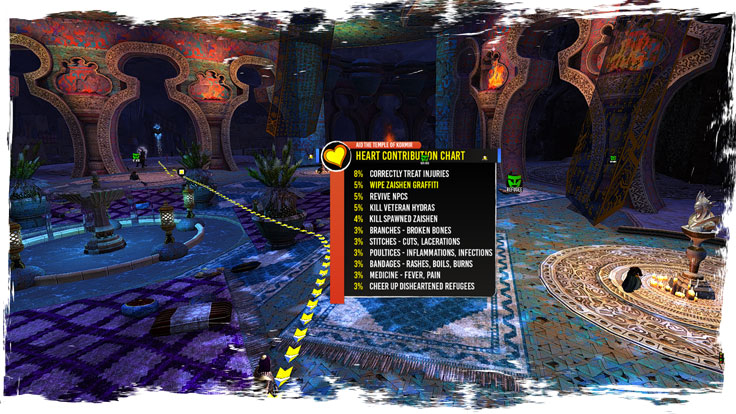
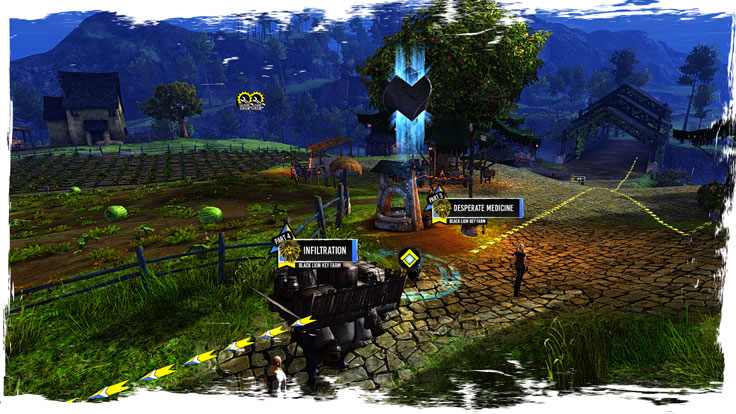
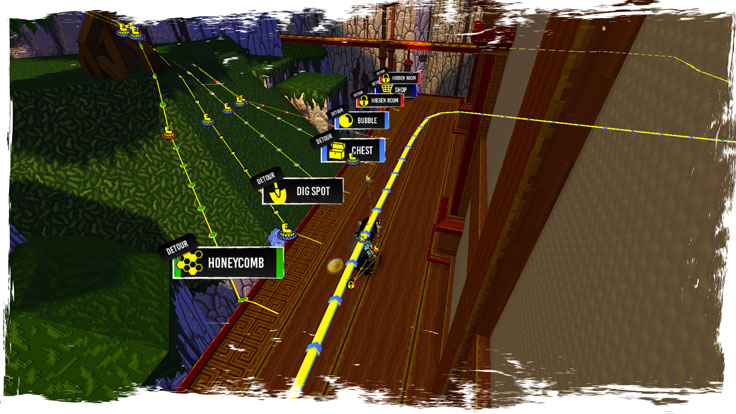
ALL-IN-ONE Marker Pack is a result of thousands of hours of hard work over the past few years. It covers pretty much everything with carefully placed handmade markers. From achievement to complex map completion routes, adventures, jumping puzzles, collections, races, you name it.
Everything is designed to be toggled in the app menu to your liking. Each part, each marker, and each route can be turned on and off separately
The number of Markers: 49920 | Trails: 1118 | Categories: 9829
Use the buttons above for detailed installation instructions and download.
In case of security concerns - TacO / BlishHUD are well-renowned overlay applications using officially provided API to function. There is no interaction with your game account, so you don't have to worry about your credentials. Using markers and routes has been allowed explicitly by ArenaNet and you won't get banned for using them.
If you feel that there is something missing in the pack, you can join our Discord and place a request in the #all-in-one-requests channel. Or if you find any bug or issue, you can report it in the #all-in-one-issues channel

- Details
- Category: Markers
- Icons have to be saved as a png file. When you have png ready make sure you will use some compressor like https://tinypng.com/ it usually save over 75% of file size and increase performance for players with slower computers.
- marker size should be around 100x100px. You can use larger but try not to do it too often since it can decrease performance.
- Put icons to \Data in TacO folder.
- Keep in mind that one day you may share them so choose unique naming for all your icons, files, makers, and categories in TacO itself.
Marker Settings
An example of Marker in categorydata.xml - most basic 1 level Category tree: My Category Square Icon"
<MarkerCategory name="mycategory">
  <MarkerCategory name="squareicon" iconFile="Data\square.png"/>
</MarkerCategory>
An example of Marker in categorydata.xml - 2 level Category tree: "My Category -> My Markers -> Square Icon" with all possible variables and default values:
<MarkerCategory name="mycategory" DisplayName="My Category">
  <MarkerCategory name="mymarkers" DisplayName="My Markers">
    <MarkerCategory name="squareicon" DisplayName="Square Icon" iconSize="1.0" behavior="4" alpha="1.0" fadeNear="1000" fadeFar="1100" heightOffset="1.5" resetLength="60" iconFile="Data\square.png"/>
  </MarkerCategory>
</MarkerCategory>
Placed Markers
An example of most basic Marker in poidata.xml
<POI MapID="123" xpos="-123.456" ypos="654.321" zpos="123.123" type="mycategory.squareicon" GUID="wPiuS7M2HUilAbjjqOD5ig=="/>
An example of Marker in poidata.xml with all possible variables and default values:
<POI MapID="123" xpos="-123.456" ypos="654.321" zpos="123.123" iconSize="1.0" behavior="4" alpha="1.0" fadeNear="1000" fadeFar="1100" heightOffset="1.5" resetLength="60" type="mycategory.mymarkers.squareicon" GUID="wPiuS7M2HUilAbjjqOD5ig=="/>
Variables:
- MapID - An identificator of a map where is marker placed. Created automatically.
- GUID - An identificator of a marker. Created automatically
- xpos, ypos, zpos - Position of marker in the world
- heightOffset - vertical offset from x,y,z position. Default = 1.5
- fadeNear - Range where marker starts disappearing.
- fadeFar - Range where marker disappears completely. It must be higher than fadeNear
- iconSize - Size if icon compares to an original image. Default = 1.0
- alpha - Transparency of marker. Default 1.0
- behavior - Number for custom behavior (list below) Default = 0.
- resetLength - Time in seconds before marker reappears after disabling. This will only work with Behavior 4.
Behaviors:
AKA what happen after you press F over a marker.
- 0 - Default non-interactive marker, always visible.
- 1 - Reappear when you change the map.
- 2 - Reappear on daily reset.
- 3 - Disappear forever once you press F.
- 4 - Reappear after a time determined by variable resetLength.
- 5 - Reappear on map reset.
- 6 - Reappear after you change map or instance of the same map
- 7 - Reappear once per daily per character
If a variable isn't present it's counted as it's there with a default value.
Sharing markers:
- Make sure in poidata.xml are only markers what you want to share and rename a file to mymarkers.xml for example.
- If you use your own markers copy from categorydata.xml your Category structure to mymarkers.xml
- Move mymarkers.xml to folder POIs in the main TacO folder.
- Move your custom icons from folder \Data to \POIs\Data.
- Share your markers with this data structure.
An example of mymarkers.xml structure with inserted custom category and 1 marker ready for sharing.
<OverlayData>
  <MarkerCategory name="mycategory">
    <MarkerCategory name="squareicon" iconFile="Data\square.png"/>
  </MarkerCategory>
  <POIs>
    <POI MapID="123" xpos="-123.456" ypos="654.321" zpos="123.123" type="mycategory.squareicon" GUID="wPiuS7M2HUilAbjjqOD5ig=="/>
  </POIs>
</OverlayData>
- Details
- Category: Markers
Custom markers that you can see in my video guides are provided by overlay applications - Guild Wars 2 Tactical Overlay (TacO), or BlishHUD. This guide will show you how to use my ALL-IN-ONE MARKER PACK with the BlishHUD. If you are looking for the TacO Installation Guide, Click HERE.
DOWNLOAD BlishHUD Download All-In-One Marker Pack
- Download the latest version of the BlishHUD from its website.

- Extract BlishHUD from the archive somewhere - I recommend Guild Wars 2 folder. You can put it anywhere, however, if you don't have admin rights on your PC user profile, the app may not work properly if placed in system folders like Program Files.

- Launch the Game in the Windowed Fullscreen mode, before you launch the app itself.. With other modes may appear some issues or the app won't show at all.

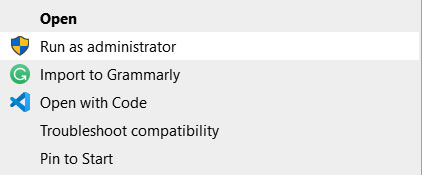
- Run the app as the Administrator, otherwise, some features may not work properly.
- Click on the BlishHUD. golem icon, next to the Game menu.

- Navigate into the "Module Repo" section, and Install the "Pathing" module. Check this tab from time to time for module updates.

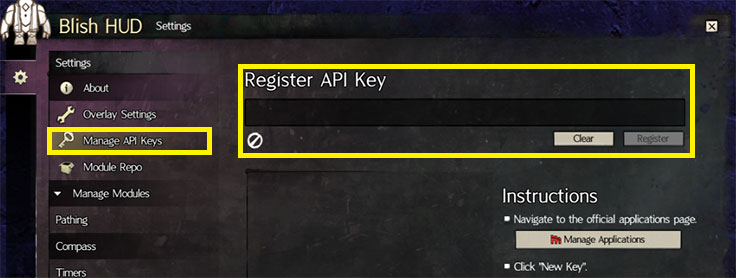
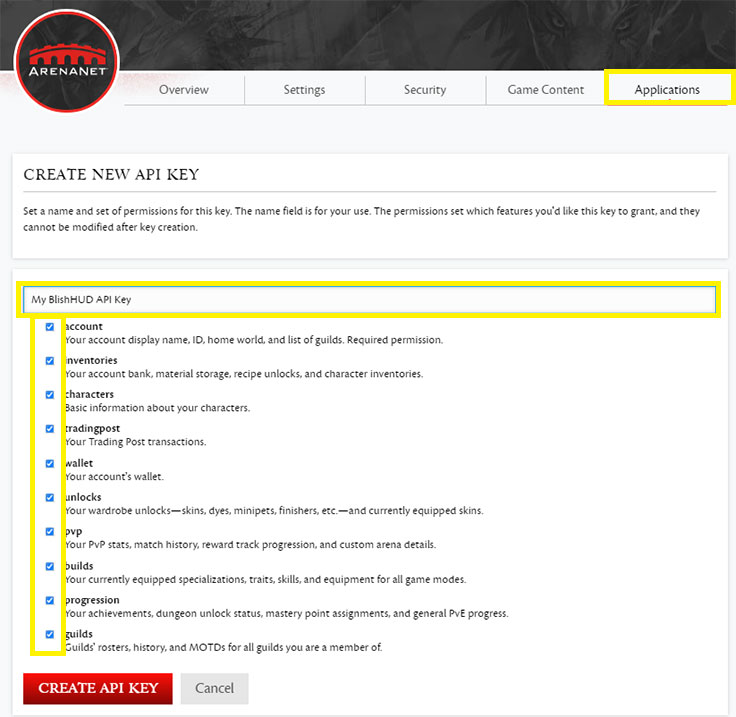
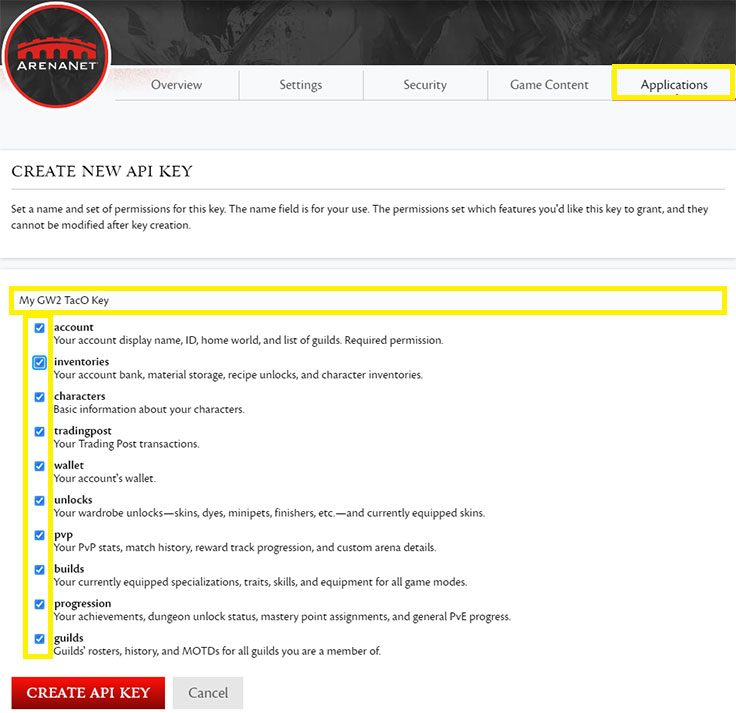
- OPTIONAL - Navigate into the "Manage API keys", and register your API key there. You can create the API key at the Official Guild Wars 2 Website -> Account - Applications tab. BlishHUD key requires only Account and Progression checkmarks. However, I recommend checking all of them to avoid possible future incompatibility in case some new features are added. This step is optional and the marker pack will work without the API key with its built-in behavior system.
- Navigate to "Manage Modules -> Pathing", and click on "Open Settings"
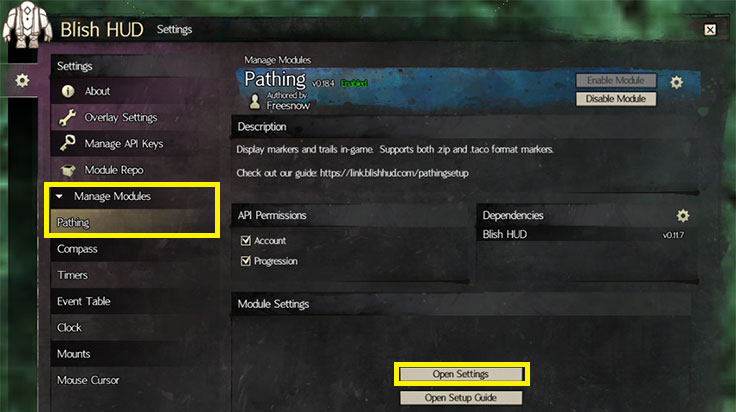
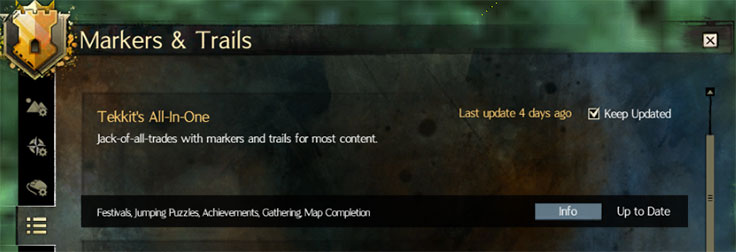
- In the Settings window select the "Download Marker Packs" tab, find "Tekkit's All-In-One", and click on "Download". Also don't forget to select the "Keep Updated" checkmark, so you don't have to take care of marker pack updates in the future.
- MANUAL INSTALLATION - In case the previous step didn't work, or you wanna use the Beta version of my pack. Download the ALL-IN-ONE MARKER PACK from the Download section, or in the case of the Beta version, from the #all-in-one-updates channel at our Discord server. Move downloaded tw_ALL_IN_ONE.taco file into the "C:\Users\YourPCName\Documents\Guild Wars 2\addons\blishhud\markers" (do not unpack it!). Override if asked.
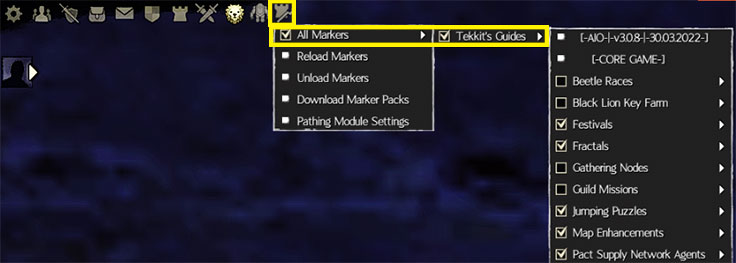
- You can toggle my markers by clicking on the tower-like icon, next to the Game Menu followed by All Markers -> Tekkit's Guides ->
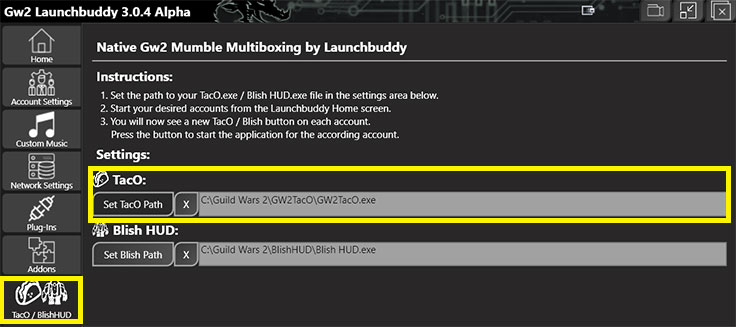
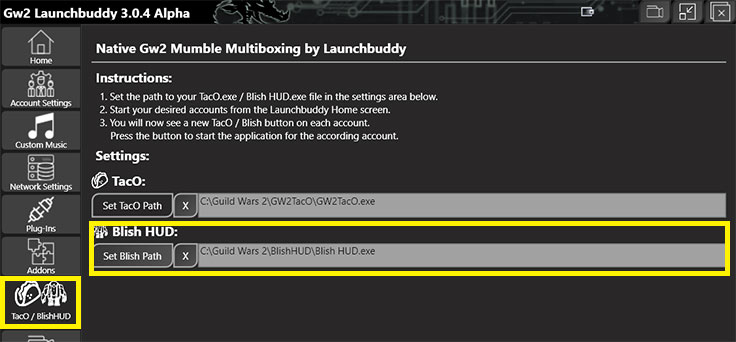
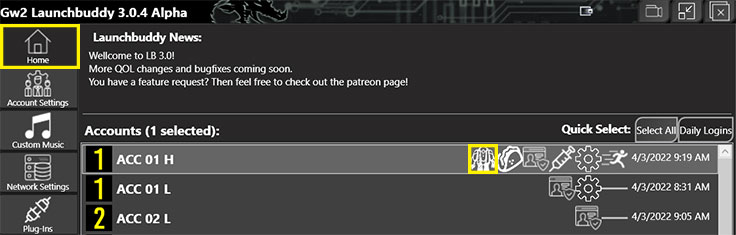
- If you use LaunchBuddy, set the path to the BlishHUD.exe in the TacO/BlishHUD tab, and then launch it with the Golem icon in the Home tab after you launch the game.
- Details
- Category: Markers
Custom markers that you can see in my video guides are provided by overlay applications - Guild Wars 2 Tactical Overlay (TacO), or BlishHUD. This guide will show you how to use my ALL-IN-ONE MARKER PACK with the GW2 TacO. If you are looking for the BlishHUD Installation Guide, Click HERE.
VIDEO GUIDE DOWNLOAD GW2 TacO Download All-In-One Marker Pack
- Download the latest version of the GW2 TacO from its website.
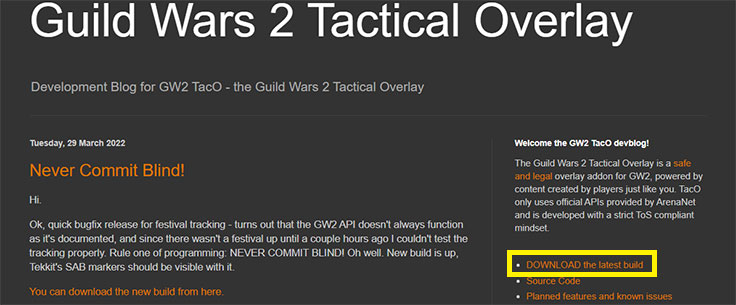
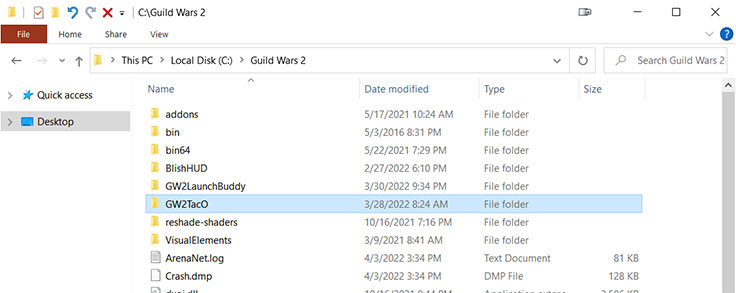
- Extract GW2 TacO from the archive somewhere - I recommend Guild Wars 2 folder. You can put it anywhere, however, if you don't have admin rights on your PC user profile, the app may not work properly if placed in system folders like Program Files.
- Launch the Game in the Windowed Fullscreen mode, before you launch the app itself. With other modes may appear some issues or the app won't show at all.
- Run the app as the Administrator, otherwise, some features may not work properly.
- Click on the GW2 TacO. taco-like icon, next to the Game menu.

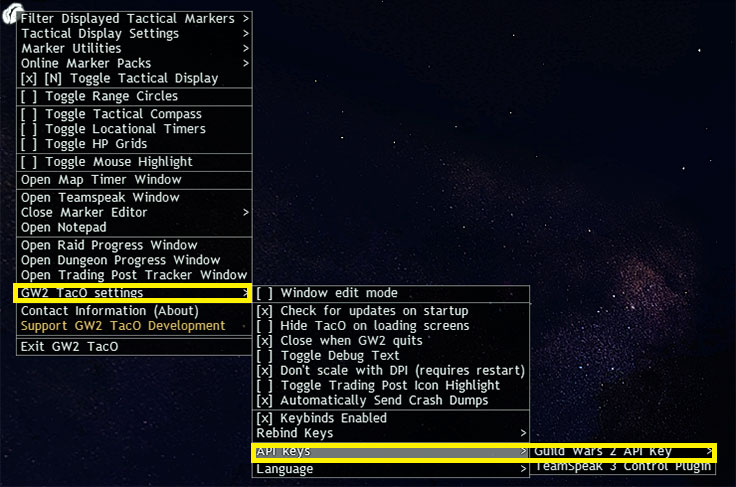
- OPTIONAL - Navigate into the "GW2 TacO settings -> API keys -> Guild Wars 2 API key", and add your API key there. You can create the API key at the Official Guild Wars 2 Website -> Account - Applications tab. GW2 TacO key requires only Account and Progression checkmarks. However, I recommend checking all of them to avoid possible future incompatibility in case some new features are added. This step is optional and the marker pack will work without the API key with its built-in behavior system.
- Navigate to "Online Marker Packs", and select "Tekkit's All-In-One". Also, don't forget to select the "Update Marker Pack Automatically" checkmark, so you don't have to take care of marker pack updates in the future.

- MANUAL INSTALLATION - In case the previous step didn't work, or you wanna use the Beta version of my pack. Download the ALL-IN-ONE MARKER PACK from the Download section, or in the case of the Beta version, from the #all-in-one-updates channel at our Discord server. Move the downloaded tw_ALL_IN_ONE.taco file into the "YourTacOFolder\POIs" (do not unpack it!). Override if asked.
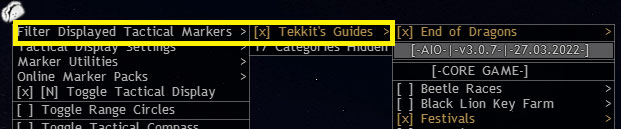
- You can toggle my markers by clicking on the taco-like icon, next to the Game Menu followed by Filter Displayed Tactical Markers -> Tekkit's Guides ->
- If you use LaunchBuddy, set the path to the GW2TacO.exe in the TacO/BlishHUD tab, and then launch it with the Golem icon in the Home tab after you launch the game.